Sunday, November 26, 2006

Homemade Vanilla Extract

I came across this recipe to make your own vanilla extract, from alcohol and vanilla beans, and of course wanted to try it right away. It is very simple to make, the hard part is waiting the six months for it to be fully mature, to have extracted the maximum goodness out of the vanilla beans. This makes a good gift for a foodie, you can make up fancy bottles, the one I used is a Tuscany bottle. Look for vanilla beans that are flexible but not brittle, and slightly oily to the touch. There are two types of vanilla beans that I have seen, the more popular, and less expensive variety of the two that I saw, is Bourbon, while the more expensive version is Tahitian. The best bourbon beans have a white "frost" of pure vanillin on the outside (this looks crystalline in direct light, while if it is mildew, it will look dull). These bourbon vanilla beans were imported from Germany, though they likely were not grown there.


Split four to six vanilla beans in half lengthwise with a sharp knife. Add to the vanilla beans in the bottle 375 mL of vodka, or any grain alcohol. Store at room temperature in a dark place for at least two months, six months preferably. As you use the vanilla extract, you can top up the bottle with fresh alcohol.

Saturday, November 25, 2006

Another Tschibo Chocolate Bar


I wrote earlier about a couple of single-source chocolate bars from the German company Tschibo, known more for their coffee, which can be found here. I came across another one in that series, this one features 71% cocoa content, the cocoa coming from outside of the city of Quevedo, in Ecuador. According to the packaging, this bar is Made to a traditional recipe with premium cocoa from selected plantations and the finest ingredients. With a full, flowery and smooth taste and subtle vanilla overtones. I can say that the chocolate is very good, smooth, easily melts in your mouth, and very chocolately. The vanilla undertones are subtle indeed.

Ataulfo Mangoes


From my research, I found out that these mangoes are now grown in Indonesia, but they came originally from a variety found in Veracruz State, Mexico. I can say that the orange-yellow flesh is very sweet, almost buttery. Delicious! The ones I tried before had yellow skins, these are more green going to yellow, though I am going to sit them on my counter for a few days to see if they ripen some more, as they are quite firm now.

Friday, November 24, 2006

Flagrants Desirs Chocolate


This Belgian chocolate, available in Dark and Orange versions, is made with 70% cocoa content. The Dark version contains only cocoa paste and butter, sugar and vanilla, while the Orange version is a little less "natural", along with the cocoa paste and butter, it also contains orange peels, sugar, glucose-fructose, citric acid, sulphur dioxide and orange flavour. I have already consumed the Dark version, it was quite good. It melts-in-the-mouth as good dark chocolate should. The wrapping only says that the cocoa comes from a selection of fine cocoa beans, and not where specifically.

Monday, November 20, 2006

Liqueur Cookies


This recipe originally called for red wine, it's a German cookie recipe that I found somewhere on the 'Net. Inspiration hit me, and I thought that I would change the recipe, to make it into a liqueur cookie. Frangelico is the famous Italian hazelnut liqueur, while limoncello is a liqueur made from lemons, it is also Italian in origin. Both of these liqueurs are ones that I had read about and wanted to try, the Frangelico for obvious reasons, and the Limoncello because I like lemon, too. I thought that I would marry the lemon flavour with vanilla, while the Frangelico would go good with hazelnuts and chocolate. These turned out quite well. To make 1/2 egg, put the whole egg in a bowl, scramble with a whisk or fork, then divide in half. Or just double the recipe to use a whole egg.

Liqueur Cookies
250 g flour
2 tsp baking powder
125 g sugar
1/2 egg
140 g butter, at room temperature
Variation 1:
1/2 cup hazelnuts, ground finely
1 Tbsp cocoa
3 Tbsp Frangelico Liqueur
Variation 2:
1 tsp vanilla
3 Tbsp Limoncello

Preheat the oven to 350F/180C. Line two baking sheets with parchment paper.

Sift the flour onto clean surface. Form a well with the flour. Add the sugar, baking powder, egg, butter and liqueur to the flour, then either the vanilla or the cocoa and hazelnuts. Mix all the ingredients by hand to form a dough. Let rest for a few minutes.

On a clean surface sprinkled with flour, roll out dough to a thickness of 1/2 inch. Using cookie cutters, cut the dough into shapes and place on the parchment paper.

Bake for 15-16 minutes, until the cookies are firm and slightly golden. Let rest on the baking sheet for a couple of minutes, then transfer to a wire rack and allow to cool.

Decorate with icing, if desired.

Makes 50-60 medium-sized cookies.


Limoncello Icing:
1/4 cup icing sugar, sifted
1 Tbsp limoncello

Mix ingredients together to make a thick icing. Add more limoncello or water if too thick, more icing sugar if too thin.

Sunday, November 19, 2006

Jiaozi

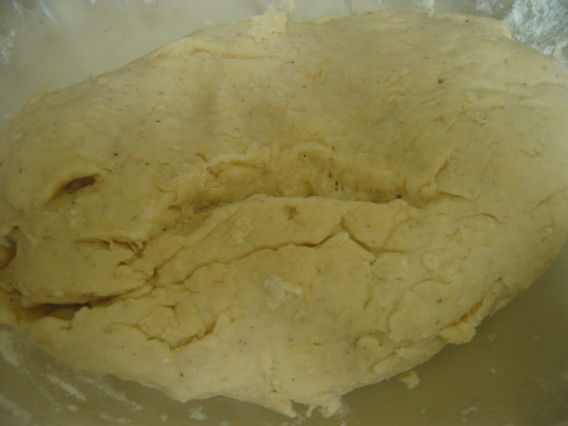
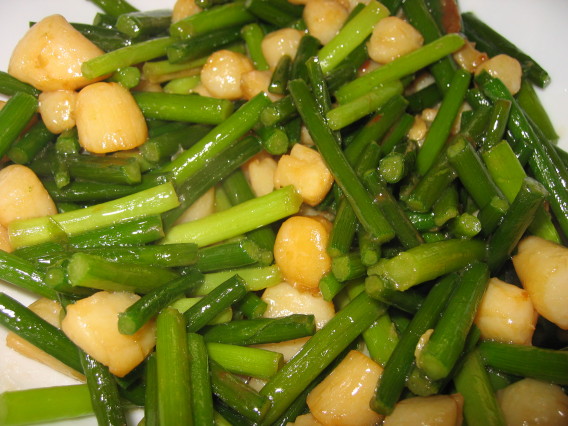
I was talking to some of the Asian ladies at work in the lunchroom (I say Asian now, as the Chinese ladies have now been joined by a woman from Thailand) about my brother-in-law cooking for me when he is visiting. They know that he is from the North, and they all joined in that he should know how to make Jiaozi, or dumplings. I said that I would ask, knowing he could cook a lot of things, but maybe not that. My sister later told me that it is a stereotype that Northerners know how to cook dumplings. Nevertheless, his mother does know, and she had taught him a little of it, so we determined to try to make them on Sunday. First we gathered the ingredients, some scallions, some ground pork, and some chives. We would make two kinds of jiaozi, one with ground pork, shredded cabbage and scallions, and one with ground pork, chives and scrambled eggs. The latter of the two is my brother-in-law's favourite, and too, it tasted the better of the two when we ate them for lunch. We decide too, for the sake of expediency, to use pre-made dumpling wrappers, instead of creating the dough and rolling it out, of course, it would have tasted better, but it tasted pretty excellent otherwise. These are two examples of fillings, you can pretty much put anything in there, even making them fully vegetarian. As for quantities, we used about 400 g of pork for each filling, a half head of white cabbage, 10-12 long chives, 6-8 scallions and 4 eggs.

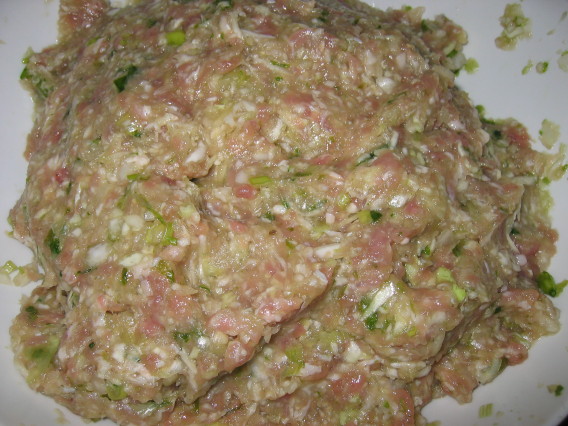
Firstly, shred the cabbage into very small pieces, we used a food processor to do so, but traditionally it is done with a knife, over a long period of time. Even the pork is traditionally minced by hand with a knife. Slice the scallions into small pieces as well. Then mix all ingredients with your hands, adding a little soya sauce, until all ingredients are combined well. There are some things that work better when mixed with your hands, this is one of them. Let rest for a few minutes, then add a little sesame oil and mix again, before assembling the dumplings.


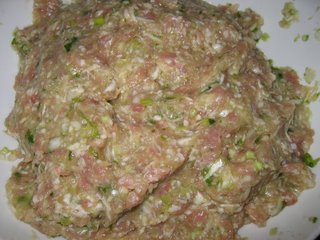
For the other one, scramble the eggs, frying them in a little oil. Let cool for 10-15 minutes, so that they are not hot and cook the meat when added. Slice the chives into very small chunks. Then mix the cooled eggs, ground pork, chives and a little soya sauce with your hands, until all ingredients are combined well. Like the other, let the filling rest for a few minutes, then add a little sesame oil and mix again, before assembling the dumplings.


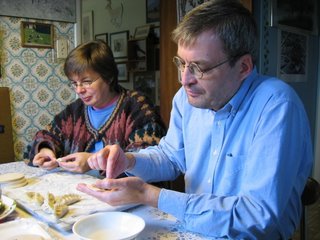
Here my sister and I work making the dumplings.


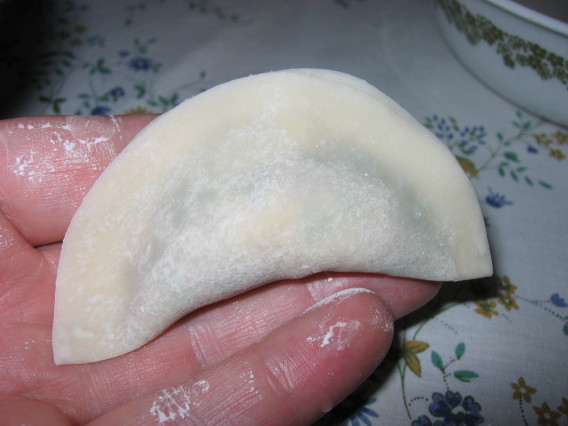
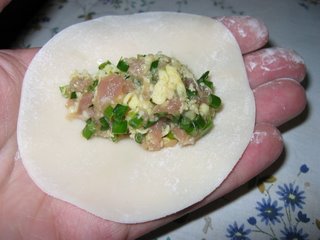
To create the dumpling, put a little bit of filling in the center of the wrapper.


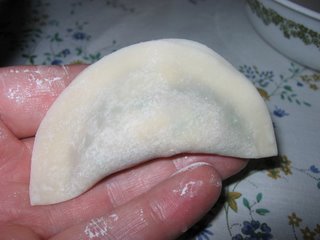
Then moisten the edges of the wrapper with a finger dipped in water. Fold over the wrapper, lining up the edges to make a half circle. The water will bind with the slight flour on the wrapper to seal the edge.


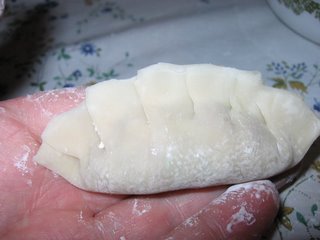
To make it seal firmly, especially the cabbage one, which tends to be more watery, and more prone to breakage when boiling, you need to crimp the edges. Fold over a small section of the outer edge and press together firmly. Repeat a number of times. When I first started, I only crimped four times, later I got better and crimped around seven times. It's a little difficult to explain, and a little difficult to master, I agree, but the picture should give you a better idea.


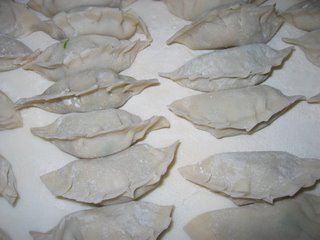
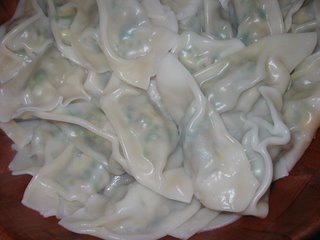
Once the dumplings are done, let them rest for a moment. Bring some water to boil.


Add the dumplings, and bring to the boil. When it does boil, add some cold water, then bring to the boil again. Repeat one more time. The dumplings are finished when they all are risen to the top, and they begin to swell, with air.


We enjoyed them with a garlic sauce, made by mincing a whole garlic bulb, adding to the minced garlic some Chinese vinegar, a little soya sauce and sesame oil, and a little salt. Drizzle over the cooked dumplings and enjoy. Or, you can just drizzle them with vinegar, any kind. I use apple cider vinegar to good effect.

Thursday, November 16, 2006

Schoko Linsen


I remember eating these in Germany one summer, when I was there for two months on a scholarship, to better my German and learn a little of the culture. I lived with a family, cousins of my mother, they had a large farm located on the edge of a quite small village. I found these in the only store there, and soon determined to be quite good. And, of course, could not find them again, not in 20 years. Till now, that is. I remember specifically liking the mint taste, putting them in my mouth and sucking on them like a hard candy, eventually the thin coating surrounding the chocolate inside becomes too weak and breaks, giving you a sudden burst of chocolate. That was the best part. Quite delicious.

Dattelbrot

My sister really likes this date bread, dattelbrot in German, and as she is here this week visiting, I thought I'd make it. I like it too. I make it with honey dates, and these particular ones are from Iran, though you can use any date for this. For the vanilla sugar, I used Bourbon vanilla sugar from Dr. Oetker, it has some of the vanilla pod in there, so there are dark specks throughout the dough. You can use ricotta, or pressed cottage cheese, in place of the quark, if you can't find quark, though I find quark to be better tasting.

Dattelbrot
150 g Quark Cheese, liquid removed
6 tbsp Milk
6 tbsp Oil
75 g Sugar
3 tsp Vanilla Sugar
pinch salt
300 g Flour, sifted
3 tsp Baking Powder
milk (for brushing)
250 g pitted dates, cut into small pieces

Remove most of the liquid from the cheese (Note: weight of cheese is without liquid). Combine cheese, milk, oil, sugars and salt. Stir until smooth.

Combine flour and baking powder. Add half the flour mixture by tablespoonfuls to the cheese mixture. Knead in the rest of the flour mixture.


Roll out the dough into a rectangle of 30x40 cm size (the short end must fit into a bread pan).


Brush milk over the surface and then spread out the dates.


Roll up the dough by the short side and place into a greased bread pan. Score the top several times to a depth of 1/2 cm. Bake at 350F for approx. 45 minutes.


Garlic Tea

My sister made this tea today, she had read about it in a health magazine, it is supposed to be an immune booster, she was feeling a little like she was coming down with a cold. This is the time of year when many people get colds, and this is a good preventative measure. The tea itself did not taste strongly like garlic, more like honey, very pleasant.

Garlic Tea
3 cloves garlic, skins removed and halved
3 cups water
1/2 cup honey
juice of half a lemon

Bring the garlic and water to a boil. Turn off the heat, then add the honey and lemon juice and stir to incorporate.

Numi Teas

It was a day for new teas, both familiar and unfamiliar. The night before, I had bought some teas, from a company called Numi, they make high quality, organic, few-ingredient teas. Indeed, their teas are full leaf, with, in their words, no bitter tasting tea dust or fannings, and no added oils or natural "flavourings" common to the market. Being a manufacturer of organic teas, they also pack them in natural paper bags, not the more common nylon ones. They are also a Fair Trade company, so that the producers of the tea receive a fairer and higher price for their wares. Too, the ingredients are very small, usually only one or two, really just the whole leaf, perhaps scented with a natural flower.


The first of the teas that I got is Moroccan Mint, made from mint leaves gathered in Morocco. I did try this yesterday and found it clean-tasting, quite strong, I often put two bags in my very large cup, but needed only one of these. Mint tea is not unusual, but the single source is. The Moroccans, apparently, find it so good, they drink 10 cups of it a day!


The second of the teas is Jasmine tea from the banks of the Gan River in Jiangxi Province in China. The tea leaves are Special Grade, and are also scented with summer picked Jasmine flowers, to give it an extra flavour that marries well with the leaf.


The last of the three teas is the most unusual of them, it contains leaves from the Honeybush, hand-picked in the mountain regions of South Africa, for hundreds of years. Honeybush is a honey-scented flowering bush, and creates a tea with a rich brew with sweet honey overtones. The honeybush is also rich in antioxidants, phytoestrogens and essential minerals. Should be interesting to try.

Unusual Tea


I was in my company's lunchroom, and was intrigued by the tea that one Chinese co-worker was preparing to make. It looked like a little bag of broccoli florets. I asked her about it, and she offered me some to try. She explained that it tastes kind of sweet, and that she got it from a Chinese friend of hers, that this herb comes from her hometown, that likely it is the only place that one can get it. Always one to try new things, especially unusual teas, I said that I would like to try it. Having steeped it for 10 minutes or so, I took my first sip. It did indeed taste kind of sweet, also a little bitter underlying, and I swear that I have tasted it before, somewhere, but I can't quite place the memory. But it tastes quite good, this co-worker of mine said to her friend that she liked it, and was gifted with a bag of it. I took the remains of the herb home to show my brother-in-law and my sister, they had never seen it before either. Even afterwards, it smells slightly bitter. If anyone can provide a clue as to what it might be, that would be great.

Tuesday, November 14, 2006

Monday Dinner


I have houseguests this week, my sister and her husband are staying for a week, they are wanting to visit the big city and are using my place as a home base. It's different having guests here, the place seems much fuller than it did last week, a lot more clutter and dirty dishes, but lots of good things too. And one of the benefits of them staying here, is the great food that he cooks. I've described some of it before, in earlier posts. On the Monday evening, he made Chicken and Chestnuts, which was quite good. I took some in for lunch the next day, too. He first toasted the chestnuts in a frying pan, then removed the papery skin off. This was not as easy as it sounds, it works better with hazelnuts. The chicken was stir-fried in a wok, with a little oil, some sugar and a dash of alcohol and some soya sauce, then cooked slowly. The last 10 minutes, the chestnuts are added. The beansprouts were stir-fried for a short while with a little vinegar. Quite tasty.

Saturday, November 11, 2006

Sarotti Single Source Chocolate Bars

There seems to be a trend among chocolatiers to create Special high quality few ingredient chocolate bars made from cacao beans from single sources. I wrote earlier about those I found from the German manufacturer Tschibo. Sarotti is also a German chocolatier, and most of the chocolate bars I have seen from them are milk chocolate, with less than great ingredients, so I was pleased to find these higher quality chocolate bars. Most of them have a high cocoa content, more than 72%, and less than five ingredients; cocoa mass, sugar, soya lecithin, vanilla flavour being among them. They cost about $4 each for 100 g of chocolate. It should be interesting to taste and compare them.


The first of these bars is the one likely I'll least enjoy, as it is a milk chocolate, with 33% cacao content. The beans themselves come from the southern coast of the island of Java, they have grown there for a long time, and have been harvested and exported since Colonial times. The Java cacao bean is of the Mexican variety Criollo, which Spanish conquistadors brought to Java in 1560.


The second of these bars is a dark chocolate with candied orange peel in it, the cacao content is 72%. The beans come from Papua New Guinea, and are of the variety Criollo and Forastero.


The third of these also has a cacao content of 72%, these beans come from north Ecuador. There are three varieties of beans in this bar, Arriba - Superior, Navida and Epoca.


The fourth of these has a cacao content of 75%, the beans come from the small African island of Sao Thome. The beans are of the variety Forastero. This bar also contains 10% caramelized cocoa kernel splinters, which should be interesting to taste.


The last, but certainly not least, has a cacao content of 85%, and contains beans from Santo Domingo located in the Caribbean.

Limoncello Liqueur Cake


I had tried some of liqueur cakes last Christmas, I especially liked the coffee one, so I was intrigued by this one, made from the Italian delicacy, limoncello. Limoncello is essentially made from lemon peel and vodka, it distills the lemon essence into the vodka over a long period of time, the result is liquid lemon sunshine, deep golden yellow in colour and intense flavour. I like lemon, the flavour of lemon, the sourness too, and eat them raw, so to have it in a cake I thought would be good. This product is a vanilla cake, flavoured with limoncello, and while it makes it quite lemony, more so than if you were to flavour it just with lemon essence, it is not overpoweringly lemony. The scent of it is very lemony. Quite good and a welcome change from regular cakes. It makes me want to try to create a cake or cheesecake, or even cookies, with limoncello liqueur.

Cocoa Camino


Having finished my excellent Green&Black's cocoa, I was looking for another good cocoa. I decided to try the organic cocoa powder from Camino, I've seen a few of their natural products at Health Food stores. What I like about their products, other than being organic, is that this is a Fair Trade product, meaning that they buy their cacao directly from small family producers, giving them a fair price for their product, allowing them to have sustainable agriculture, rather than what many large corporations do, that is, giving very little in recompense for their product and selling it at a high price and taking all the profit. Beyond that, it all depends on whether the cocoa is actually any good, whether it works well in your end product, baked goods, and this one works well. It is Dutch-processed, which means it has a milder flavour, but a darker colour. You can see the end result in several of the last cookies I baked, they are quite dark.

Friday, November 10, 2006

Five things to eat before I die

I've come across this meme on other blogs, and thought I'd try my hand at it, even though I have not been, to my knowledge, tagged to do it. These follow in no particular order.

Ever since I read about the King of Fruit in David Quammen's book 'The Boilerplate Rhino - Nature in the Eye of the Beholder', I have been intrigued by the idea of going to Indonesia. There, if I were to arrive in the right season, and go to the right place, a tiny volcanic island called Ternate, I could find and taste a freshly picked Durian fruit and savour the strange, rich, wonderful flavour, all the while enduring the overwhelming pungent smell. But it would be worth it, I think.

Being a chocoholic by nature, I would like to go to the source of cacao, be it in South America, or Africa, to see where it is picked and processed. Or, to go and tour places where they take that raw cacao nibs goodness and make it into edible chocolate, say in Switzerland or France or Italy, home to some of the best chocolatiers.

Having written about the excellent coffee that comes from Costa Rica, I would too be remiss to not go to that country and make a tour of several coffee plantations, there to drink wonderful freshly roasted coffee.

What I write about too, beyond chocolate and all its goodness, is the wonderful nut that is the hazelnut. And where better to go, than to the American Northwest, specifically Oregon, there to taste freshly picked hazelnuts from the bush as they ripen, and to attend Hazelnut Festivals, eat hazelnut baked goods, revel in all things hazelnut.

Lastly, I would like to go and drink some freshly brewed green tea in the place where it is grown in China, specifically that called Long Jing, or Dragon Well in English, prepared in the old way, and savour the freshly brewed goodness of that special tea.

Espresso Spritz Cookies


These were called Mocha Spritz when I found the recipe, but in the light of the excellent espresso powder that I obtained, that filled my place with the wonderful aroma of espresso as I added the water to the powder, then again, even stronger, when I was baking these, I decided to rename them Espresso Spritz. They taste even better than they smelled, chocolatey and coffee too, two thirds of the Holy Triad that I've read about, the third part being hazelnuts. The dough in this batch did not turn out as well as my first batch of spritz cookies, they did not form into the shapes as well, creating some misshapen pieces. Perhaps, too, it was my lack of experience using the cookie press, they did start looking better by the end.

Espresso Spritz Cookies
adapted from a recipe found in Family Circle "Christmas Cookies & Crafts," December 2002
2 tablespoons instant espresso powder
1 tablespoon water
2-1/4 cups all-purpose flour
1/4 cup unsweetened cocoa powder
1/2 teaspoon ground nutmeg
1/2 teaspoon salt
1 cup unsalted butter, at room temperature
1 cup granulated sugar
1 egg
1 teaspoon vanilla extract

Preheat oven to 180C/350F.

In a small bowl, stir together the espresso powder in the water to dissolve the espresso powder.

In a medium bowl, whisk together the flour, cocoa powder, nutmeg and salt until well blended.

In a large bowl, beat together the butter, sugar, egg and vanilla on medium speed until light and fluffy, about 3 minutes. Beat in the dissolved espresso. Stir the flour mixture into the butter mixture until well blended.

Spoon the dough into a cookie press. Press the dough out onto ungreased baking sheets, spacing the cookies about 1 inch apart.

Bake the cookies for 12 minutes or until they are dry. With a metal spatula, transfer cookies to wire racks to cool completely.

Makes about 108 cookies.

Espresso Powder


I had been looking for espresso powder, not really to drink, as I prefer using ground coffee beans to drink, rather I wanted some to use in various recipes that I have acquired here and there over the years. This was highly recommended by the cashier fellow who rung in my order, and from the scent of the first couple of tablespoons I used, which permeated my whole place, a good smell, I can see that it would taste great. The 57 on the label refers to 57 degrees, which is, according to this company, the perfect temperature to roast coffee beans to create the ultimate espresso roast.

Toffee Hazelnut Chocolate Chip Cookies


The other recipe I tried from the Williams-Sonoma Cookies cookbook was simply called Chocolate Chip cookies, and originally had walnuts in them, but I like hazelnuts much better, as you know, and also I like the addition of the toffee bits, also not in the original recipe. The combination of hazelnut and chocolate and toffee works well, I think, and these went much faster than the Butterscotch Coconut ones I made at the same time. These I definitely will make again.

Toffee Hazelnut Chocolate Chip Cookies
adapted from a recipe from Williams-Sonoma Cookies
1-1/3 cups all-purpose flour
1/2 tsp baking powder
1/2 tsp baking soda
1/2 tsp salt
1/2 cup (1 stick) unsalted butter, at room temperature
1/2 cup sugar
1/2 cup packed light brown sugar
1 large egg
1 tsp vanilla extract
1 cup semi-sweet chocolate chips
1 cup hazelnuts, toasted, then ground finely
1/3 cup toffee bits

Preheat the oven to 180C/350F. Line two or three baking sheets with parchment paper.

To toast hazelnuts, place on baking sheet and place in oven for 7-10 minutes at 350F, shaking occasionally. Remove from oven when they become fragrant, then place in towel, let cool for a moment or two, then rub the papery skins off with the towel.

Grind the hazelnuts in a food processor or blender with a little sugar.

Whisk together the flour, baking powder, baking powder and salt in a medium bowl; set aside.

In the bowl of an electric mixer fitted with the paddle attachment, cream the butter and both sugars on medium speed until light and fluffy, 2 to 3 minutes, scraping down the sides once or twice during mixing. The sugar should not be gritty when rubbed between your thumb and finger. Add the egg and vanilla and beat on low speed until blended, again scraping the sides of the bowl.

Add the flour mixture to the bowl and beat on low speed until combined. Add the chocolate chips, toffee bits and ground hazelnuts and beat on low speed until just combined.

Shape the dough into 1-inch balls and place on baking sheets about 2 inches apart, to allow for spreading.

Bake the cookies for about 12 minutes, until golden brown around the edges. Cool on baking sheets for two to three minutes, then transfer to wire racks to cool completely.

Butterscotch Coconut Cookies


I had bought the Williams-Sonoma cookbook called Cookies the other day, and decided to make two recipes, they have essentially the same ingredients, save for the twist that makes it a different cookie. The twist of this cookie is the butterscotch and coconut, a combination I would never have thought that would work, let alone would think of even trying. It was fairly good, though I don't think that the combination really worked, and likely won't make them again.

Butterscotch Coconut Cookies
adapted from a recipe from Williams-Sonoma Cookies
1-1/3 cups all-purpose flour
1/2 tsp baking powder
1/2 tsp baking soda
1/2 tsp salt
1/2 cup (1 stick) unsalted butter, at room temperature
1/2 cup sugar
1/2 cup packed light brown sugar
1 large egg
1 tsp vanilla extract
1 cup sweetened shredded dried coconut
1-1/2 cups butterscotch chips

Preheat the oven to 160C/325F. Line two or three baking sheets with parchment paper.

Whisk together the flour, baking powder, baking powder and salt in a medium bowl; set aside.

In the bowl of an electric mixer fitted with the paddle attachment, cream the butter and both sugars on medium speed until light and fluffy, 2 to 3 minutes, scraping down the sides once or twice during mixing. The sugar should not be gritty when rubbed between your thumb and finger. Add the egg and vanilla and beat on low speed until blended, again scraping the sides of the bowl.

Add the flour mixture to the bowl and beat on low speed until combined. Add the coconut and butterscotch chips and beat on low speed until just combined.

Shape the dough into 1-inch balls and place on baking sheets about 2 inches apart, to allow for spreading.

Bake the cookies for about 15 minutes, until golden brown around the edges. Cool on baking sheets for two to three minutes, then transfer to wire racks to cool completely.

Tuesday, November 07, 2006

Sunday Feast

Last Sunday, my brother-in-law was in the mood to make several dishes for the meal we normally have. For me, he wanted to make a dish with Suan Tai, or Garlic Stems, and scallops, the one I wanted to try, the second I like. It's a simple dish, just add a little starch to the scallops to make them a little more juicy, then stir fry them, adding a little salt, with the suan tai until the juice that escapes from the scallops is cooked off.


The second of the dishes is one of the most colourful, and therefore thought to be one of the best dishes. It combines the yellow of scrambled eggs, the red of tomatoes and the green of spring onions. Scramble the eggs on a non-stick frying pan, then add the tomatoes, cut into large pieces, and spring onions, chopped into small pieces, and fry until the water from the tomatoes is cooked off, stirring the ingredients occasionally to keep from burning. It tasted pretty good and would be very easy to make.


Next comes a dish with East melon, perhaps also called Winter melon, an interesting dish, combining mushrooms and shrimp with the melon. This dish is best made with small dried shrimp, which can be found at most Chinese Supermarkets, though you can always substitute fresh shrimp. This is cooked in a wok or deep dish frying pan, until the melon becomes translucent, about 45 minutes. It ends up being mostly a soup, and you can add a little starch to thicken the liquid at the end.


The last dish was one that he made as a request from me, as I wanted to try bitter melon, a vegetable I had heard about was good for reducing internal heat, mostly it's eaten in summer. As most foods are that are "good for you", it doesn't taste the best, it is quite bitter, and often people boil it for a couple of minutes to remove the bitterness, and even add a little sugar to cover it. We did neither. First he cut it in half, then he removed the inner seeds. Slicing it fairly thin, he then stir-fried it with pork, adding a little salt. It did taste very bitter, and it's not something I would want to eat every week.


Sunday, November 05, 2006

Chocolate Chip Hazelnut Biscuits


These did not turn out as well as the others I made at the same time, they ended up not being very substantial dough-wise, and while they initially rose very high, they soon fell to make a thin cookie. Not at all what I expected, though they did taste good.

Chocolate Chip Hazelnut Biscuits
1 cup all-purpose flour
1 tsp baking powder
1 tsp salt
6 Tbsp butter
1 cup caster (superfine) sugar
1/3 cup soft light brown sugar
1 egg
1 tsp vanilla extract
115 g semisweet chocolate chips
50 g roasted hazelnuts, chopped

Preheat the oven to 180C/350F. Grease 2 or 3 baking sheets.

Sift the flour, baking powder and salt into a bowl. Set aside.

Cream the butter and sugars together. Beat in the egg and vanilla extract. Add the flour mixture and beat well.

Stir in the chocolate chips and 3/4 the hazelnuts. Drop teaspoonfuls of the mixture on to the baking sheets in heaping mounds. Space them 2 inches apart to allow room for spreading.

Flatten each round lightly with a wet fork. Sprinkle the remaining hazelnuts on tip and press lightly into the surface. Bake for 10-12 minutes, until golden brown. Transfer the cookies to a wire rack to cool.

Chocolate Hazelnut Icebox Cookies


These were much more popular than the other cookie I made that day, which I will blog about next, they garnered more rave reviews. I like the chocolateyness of these cookies. And, of course, the hazelnut! Like all icebox cookies, you can make this, then freeze it, take some out, cut off a few slices, refreeze the remainder, so you can bake only a few cookies at a time. The original recipe did not call for vanilla, but I usually add it, and did, I find it makes the cookie work better.

Chocolate Hazelnut Icebox Cookies
Adapted from a recipe from oregonhazelnuts.org
3/4 cup roasted hazelnuts
1-3/4 cups plus 2 tablespoons all-purpose flour
pinch of salt
3 tablespoons unsweetened cocoa
1 cup (2 sticks) unsalted butter, room temperature
1 tsp vanilla
1/2 cup sugar
1 large egg

Preheat oven to 350F.

Finely chop hazelnuts with 1/2 cup flour and salt in food processor. Blend in remaining flour and cocoa.

Using an electric mixer, cream butter with sugar in large bowl until light, stopping occasionally to scrape down sides. Beat in egg until well blended. Add flour and nut-cocoa mixture until dough just begins to come together.

Form dough into cylinder about 1-1/2 to 2 inches wide, 10 to 12 inches long, and wrap in plastic wrap. Refrigerate until firm enough to slice, about 30 minutes.

Slice into 1/4-inch slices. Place on ungreased cookie sheet and bake for 4 to 7 minutes or just until set. Remove from sheet and cool on rack.

Dip the ends in melted semisweet chocolate, or use it to glaze the tops of the cookies for a fancy finish.

Makes about 25 cookies.

Chocolate Spritz Cookies


A couple of ladies at work both made the comment that these cookies taste like Christmas. They taste very good, I'm not quite sure what Christmas tastes like, rather I think they invoke a memory of eating cookies at Christmas. I can't guarantee that you'll get the same reaction, but they will like them. This recipe came with the Kuhn Rikon cookie press I wrote about earlier. The recipe must be followed quite closely, in order to make the dough pliable enough to be able to easily load into the tube, stiff enough to be able to be extruded and hold the shape of the cookie, and sticky enough to stick to the baking sheet. The baking sheet too must be clean, cold and not non-stick coated. Fortunately, I have these professional steel baking sheets that work quite well.

Chocolate Spritz Cookies
adapted from a recipe by Kuhn Rikon
1 cup (2 sticks) unsalted butter, at room temperature
1 cup granulated sugar
1 large egg
2 Tbsp of milk (or water)
2-1/2 tsp vanilla extract
1/2 tsp salt
1/4 cup unsweetened cocoa powder
2-1/2 cups all-purpose flour, sifted

Preheat oven to 375F.

Whisk together the flour and sifted cocoa.

Cream butter and sugar until light and fluffy, on medium speed on mixer.

Beat in the egg, milk, vanilla extract and salt until combined. Stir in cocoa flour mixture by hand or using low speed on mixer, until well combined.

Pack the dough into cookie press. Fit with the desired disk design. Press the dough out onto ungreased baking sheets spacing the cookies 1 inch apart.

Bake until lightly golden, about 10-12 minutes. Leave on baking sheet to cool for a few minutes, then transfer to wire rack to cool completely.

Store in airtight container at room temperature for up to 4 days.

Makes about 8 dozen cookies, depending on size.

Ginger and Honey Tea


I found this tea in a Chinese Supermarket, rather than a West Indies one. I have another ginger tea, ginger with peach flavouring, I find that one spicy hot, while this one is sweeter, and not so spicy. Could be, that it's the honey. I have grown to really like ginger, and have it in many things, juiced in fresh juice, in savoury and sweet dishes, and in tea. It's a truly versatile and healthful food.